Click image to zoom in

Bath Interferometer for under $150

A Bath Interferometer combined with free software can allow you to test your telescope mirror 10x more accurately and much faster than a foucault or knife edge test and with less knowledge needed to interpret the results. I plan to improve this page often. The first thing I want to point you to is my store where you can get an entire interferometer kit or order just the portions you need (e.g. just a splitter cube).


Bath Interferometer Kit($40 to $195)

Click here for assembly instructions


Interferometer

3d printable files for the interferometer are here: Interferometer design

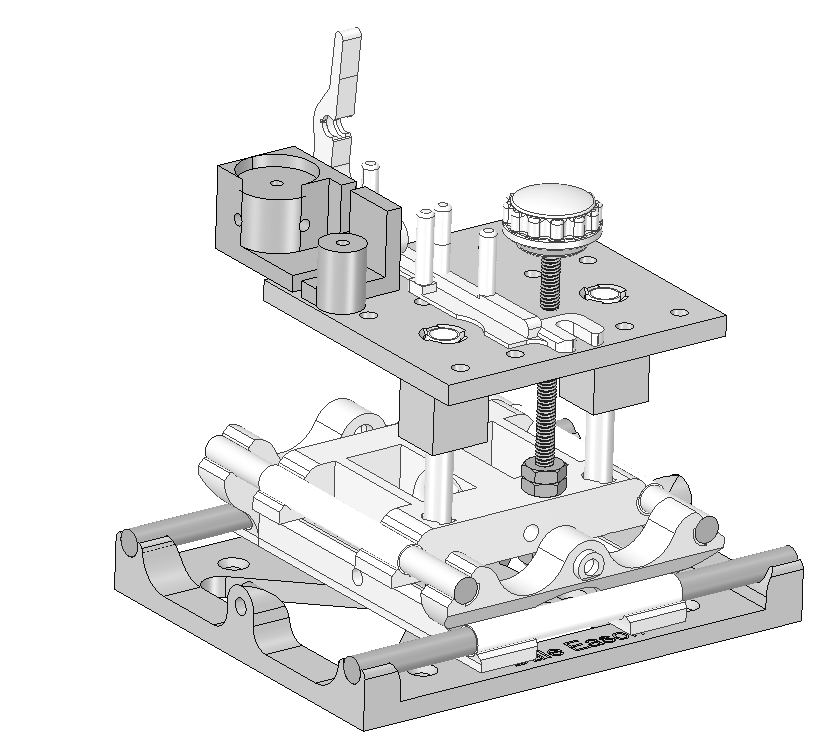
Dale Eason designed both the interferometer and the XYZ table and then I have made small changes over the years including changing this design slightly to fit M3 screws so all the screws are the same. If you have a 3d printer, feel free to contact me for absolute latest STL files. I update thingiverse occasionally with minor improvements.

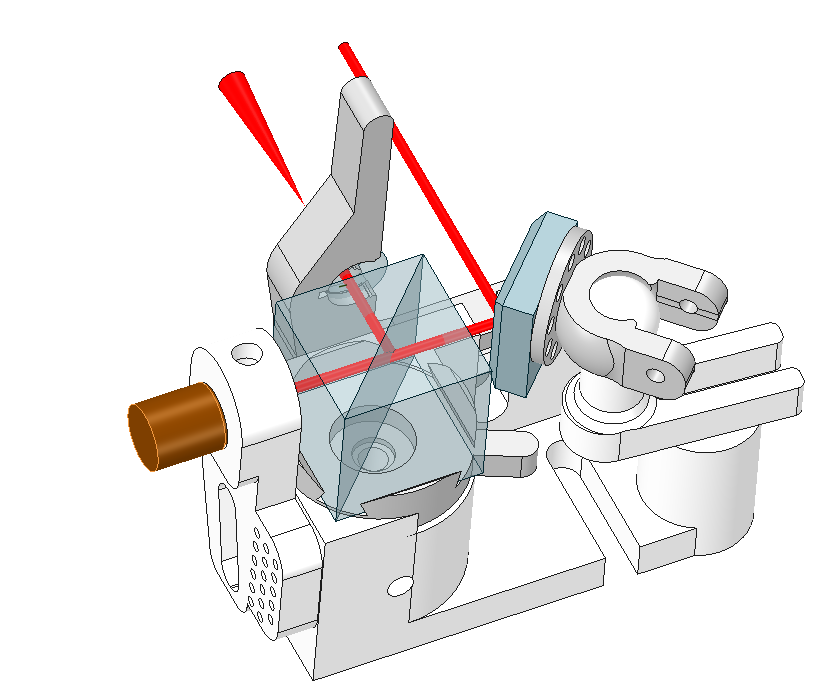
Optical parts you will need (you only need one each laser, splitter, flat, diverger but I list multiple sources)


Selecting a Diverging lens

This part will be different for different mirrors. The photo at the left is what it looks like when a typical lens is used. In this case it was a 6mm diameter (tiny!) lens with 12mm focal length. In this photo I used a $7 green laser which happened to have a beam diameter of about 1.5mm. The shorter the focal length the larger coverage you get as measured here. The formula for the coverage is that you will get just enough coverage for your mirror if the lens_focal_length = mirror F/# times 2 times laser diameter in mm. Shorter focal length gives you larger area. Since usable laser diameter is roughly 1.75mm (for typical red lasers), if you are testing a F/10 mirror then 35mm focal length diverger is just barely enough - better to use 15-20mm focal length for some margin. You may decide to get a 2mm focal length lens so it works with all mirrors but then the resulting coverage area will be that much dimmer and the lens more expensive.

The diameter of the lens can be quite small as the beam passing through it is typically 2mm at the most. I recommend 5mm to 10mm.

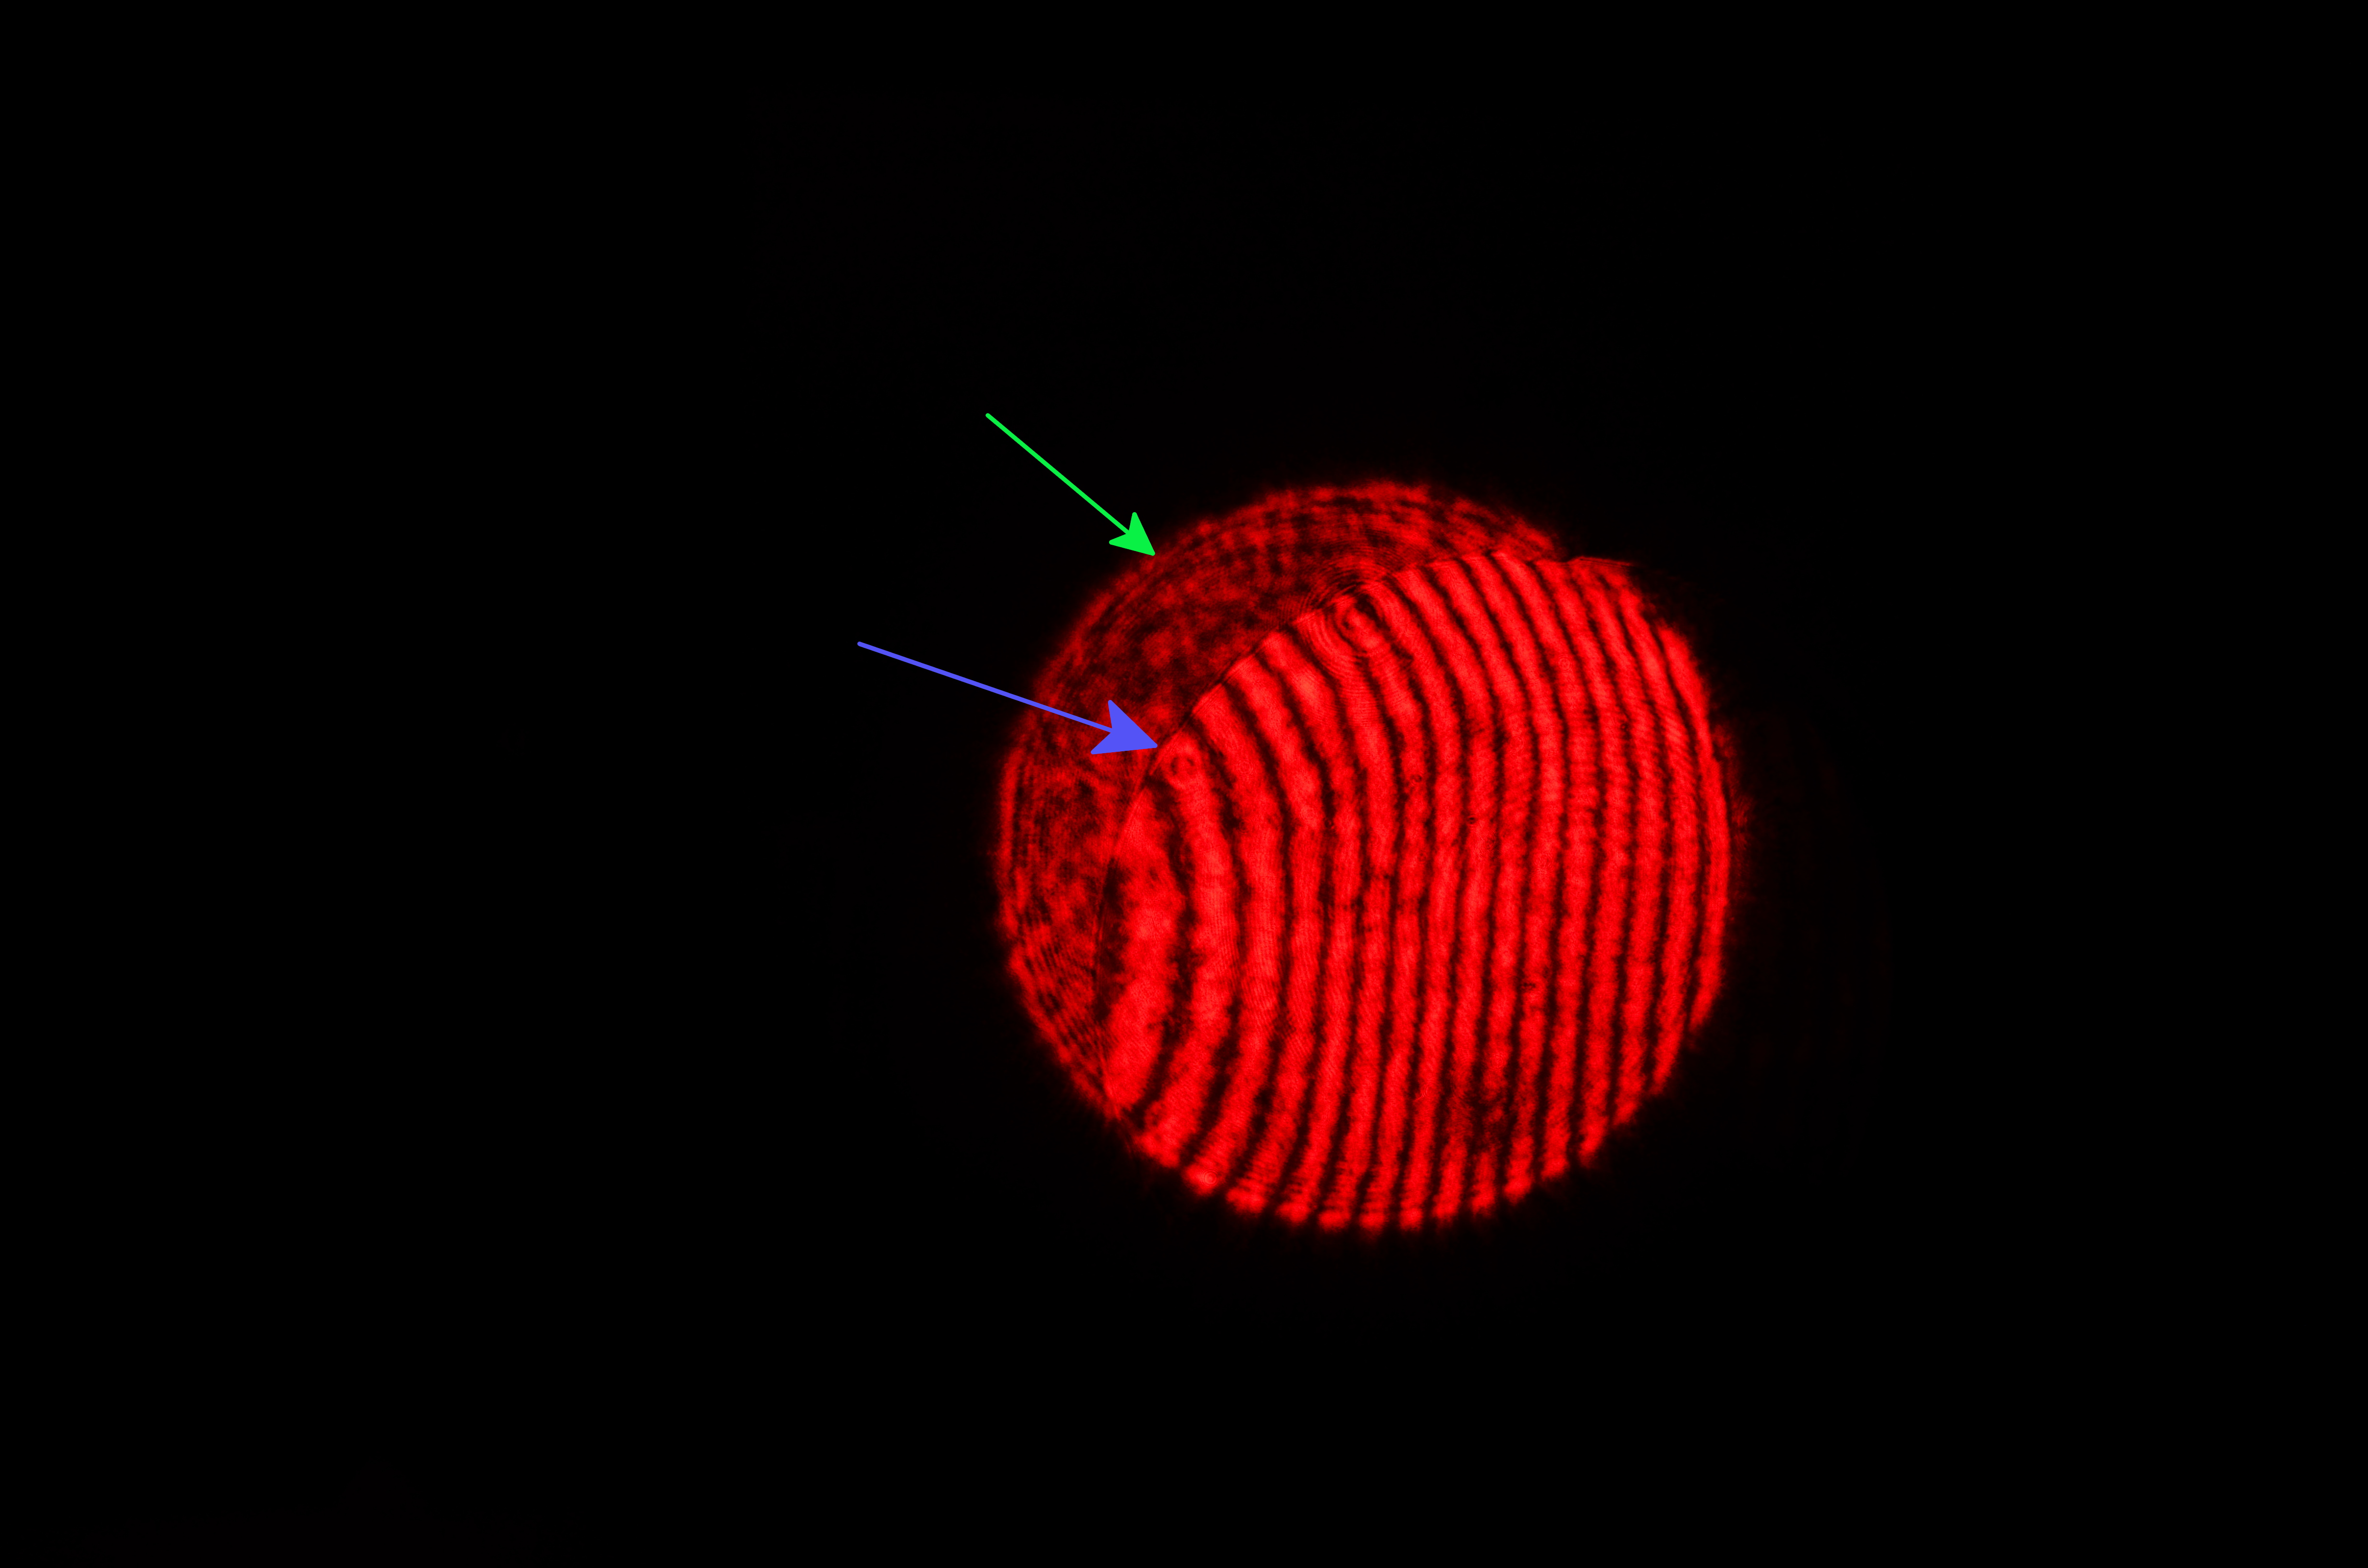
By the way the quality of the green coverage in this image has tons of noise in it and in this case it almost all came from the laser but some also from the diverger and splitter. diverging lenses and especially splitters are easy to clean and often just need a puff of air. Lasers however usually need to be disassembled and many laser types have plastic lenses that scratch when assembled.

The lens should be biconvex (BCX) (spherical both sides). Avoid planoconvex (aka PCX) which will add spherical abberation for lenses shorter than around F/8 (PCX actually isn't so bad - it may introduce spherical aberration but if you flip the lens around it will introduce the same amount in the opposite sign so if you only have a PCX make sure to test both ways to see how much S.A. changes). The lens can be the cheapest glass (typically N-BK7, N-SF5 but there are dozens of others). The lens does not need to be aspheric and can even be a well polished sphere (ball lens). You do not need coatings (they won't hurt - even if they are designed for non-visible light they will just dim the light a bit). You do not need doublets because you will only be using one color at a time (normal lenses focus different colors at a slightly different focal point creating rainbow patterns). Avoid achromats! Actually achromats may work fine - I don't know.

Avoid molded lenses. Avoid plastic lenses. Avoid lenses meant to be used to focus an LED. Avoid "condenser" lenses which are designed to focus light roughly on a slide in a slide projector (or similar) and are not necessarily accurate.

Here are good choices. Try to pick the longest focal length lens that works with your mirror F/# to get a bright beam.

focal length price diameter Approx Min. F/# part number
9mm$25.506mmF/3.6 Edmund Optics #32-020
10mm$22.756mmF/4 Thorlabs LB1157
10mm$4.507mmF/4 Surplus Shed L8344 (this is 9.8mm F.L., not 6mm as advertised - most of the focal lengths under 20mm are wrong at surplus shed) This is DCX, not BCX but the curves are similar and close enough for very high accuracy
12mm$25.506mmF/4.8 Edmund Optics #32-964
18mm$25.506mmF/7 Edmund Optics #32-966
30mm$25.506mmF/13 Edmund Optics #45-133


PCX Calculator

If you do decide to get a PCX (planoconvex lens) or if you have a DCX lens and want to know worst case how much spherical aberration may be added here's a calculator to determine that:
PCX focal length mm     
Mirror F/#      
S.A. added to your DFTFringe Z8 term: (if the flat side faces the splitter and curved side faces the mirror your S.A. term will be less negative (more positive). In other words it will make a parabolic mirror appear to be more undercorrected in DFTFringe. If the PCX plano side faces the mirror then it will subtract from Z8 term (make the mirror look more overcorrected in DFTFringe).


Selecting camera and lens

If you don't already own a DSLR, get one with live view mode - this is critical. I recommend a used Nikon or Cannon. I use the Nikon D7000 which costs $200 used on ebay. It's best to avoid zoom lenses but I had luck with a 100-300 zoom (no luck with my 18-105mm zoom). Fixed lenses are cheaper and work quite well. The problem is that the cone of light coming out of the splitter to the camera expands quite quickly and even with the lens touching the splitter, zoom lenses tend to vignette the igram too much as you can see below.

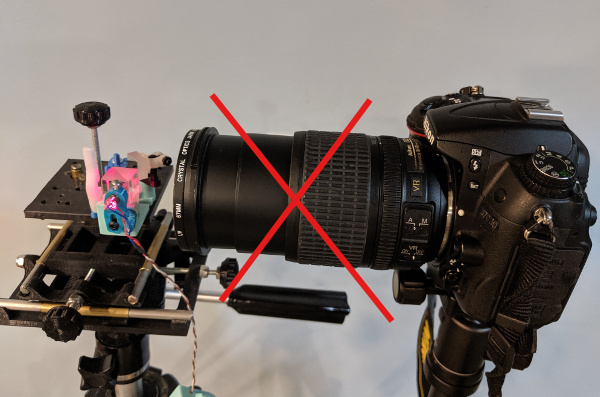
You want the focal length of the camera lens to be 8X to 25X the f/# of the mirror under test (e.g. F/4 mirror under test is best when tested using 32mm to 100mm lens). F/2 lenses (or even wider) are ideal.

18-105mm zoom at 105mm vignettes (green arrow) so badly that the red circle looks a circular mirror but is not. If I hadn't shifted the mirror to the right one could easily think the vignetting was the edge of the mirror! Mirror edge pointed by blue arrow. It's like looking through a straw. Zoomed at 18mm and moved until touching the splitter cube was even worse. Click image to zoom in and see this better.
Setup for photo at left (in summary: zoom lenses usually won't work)

Camera Lens Calculator

This will help you choose a camera and lens combination. Enter your info
F/# of mirror to test     
DSLR Sensor Crop Factor aka "format factor" aka "focal length multiplier" this is 1X for a "full frame" sensor and 1.5X for more common, cheaper DSLRs
Camera Lens Focal Length in mm. Again, don't use zoom lenses.
This means X% of vertical field taken by the igram (50% ideal, must be < 100%)
Megapixels of camera
This means X vertical pixels for your camera (assuming 4:3 ratio)
This means X pixels on camera taken up by igram. Recommend at least 300 pixels. You need at least 3 pixels per fringe. Otherwise the fringes blur out to invisibility.


Videos


Software

The latest DFTFringe can be downloaded here


What can be tested with a Bath?

Bath works best with concave spherical mirrors of any size but will also work well with parabolic mirrors down to a certain F#. For example 25 inch mirrors as short as F/3.7 or 12 inch mirrors as short as F/3. Longer focal length mirrors e.g. F/4 are much easier. This limit is because the farther a mirror is from a perfect sphere, the more fringes it will have and at some point there are so many fringes (e.g. 1000), that you can no longer visually separate them (just a gray blur). For more details about how to test your F/2 mirror contact me.


Discussion group where questions can be answered

https://groups.io/g/Interferometry/messages


Excellent introduction materials

bathanalysisv2.5.pdf


Software to analyze digital images of your fringes

https://github.com/githubdoe/DFTFringe/releases


Feel free to email me with questions/issues/problems.